GCSE Photography
Back up project: CLOSE UP
|
Here you will find all of your lessons and homework. You will be expected to catch up at home if you miss anything, so please do so independently.
|

|
Task One: What is Macro Photography?

These are examples of Macro photography. What do you think this means?


Macro is a setting on your camera that tells your camera to expect a close up photograph. You hold your camera close to the subject and it captures all of the details.
What would look interesting to photograph close up? Make a list of 20 things in pairs!
What would look interesting to photograph close up? Make a list of 20 things in pairs!

Your Task
Create a slide full of photographs of all different types of close up things that inspire you.
Add a sentence next to each image that explains briefly what it is that you like about the image - for higher marks try to refer to the formal elements and other things you have learnt so far in photography.
Include an explanation of 'What is Macro Photography?'
Add a sentence next to each image that explains briefly what it is that you like about the image - for higher marks try to refer to the formal elements and other things you have learnt so far in photography.
Include an explanation of 'What is Macro Photography?'
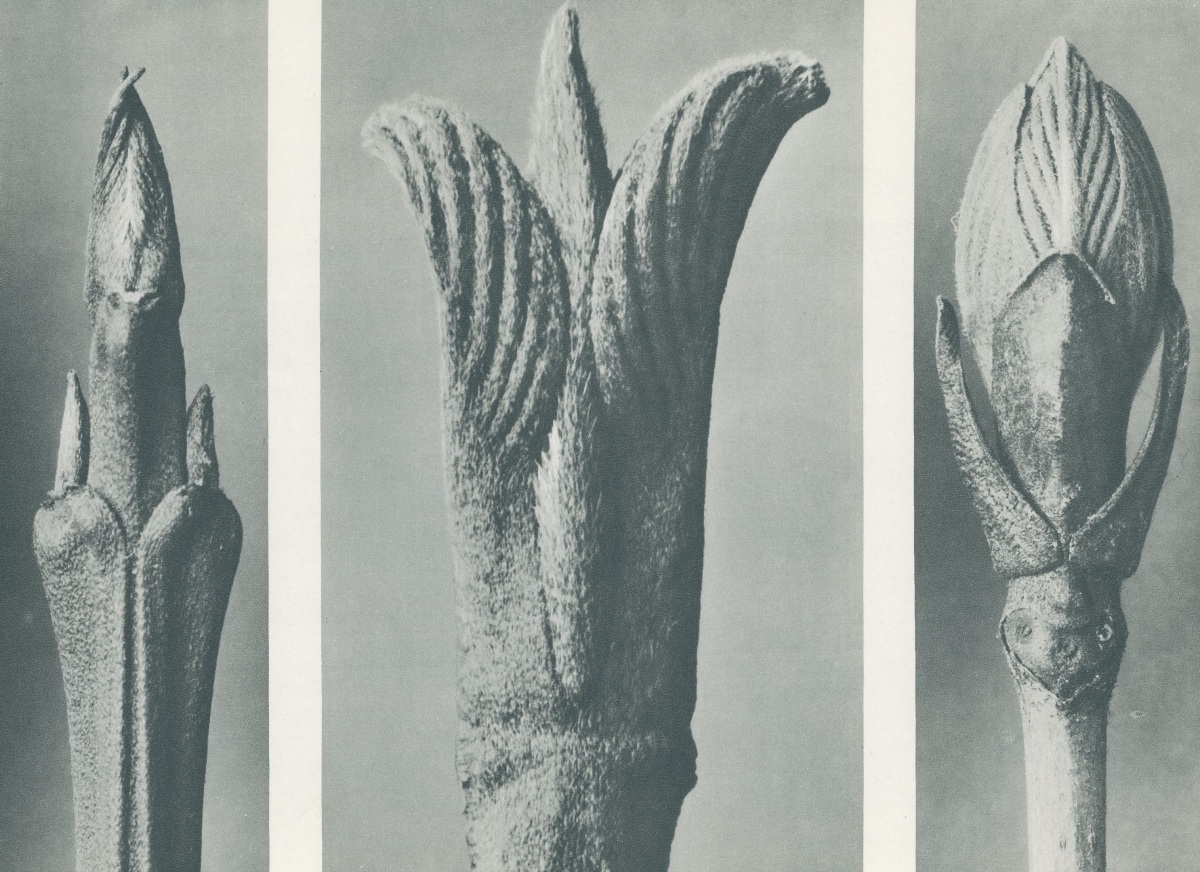
Task Two: Karl Blossfeldt

Describe the style of Karl Blossfeldt's work from these images below:


Karl Blossfeldt
Strikingly modern and inherently beautiful, Karl Blossfeldt's photographs of plants, flowers and seed heads are as appealing today, as they were when they were first introduced to the public in his two landmark books Urformen der Kunst, (Archetypal Forms of Art), 1929 and Wundergarten der Natur, (The Wondergarden of Nature), 1932.
The curious thing is that he wasn't a photographer, exactly. Blossfeldt used photography as a tool for his other work. He used his stunning macros for teaching visual references to his students, and he photographed plants and flowers, so they were easier to draw. Blossfeldt used these drawings as inputs and material to reinvigorate the study of design.
Enlarge
ENQUIRE
Strikingly modern and inherently beautiful, Karl Blossfeldt's photographs of plants, flowers and seed heads are as appealing today, as they were when they were first introduced to the public in his two landmark books Urformen der Kunst, (Archetypal Forms of Art), 1929 and Wundergarten der Natur, (The Wondergarden of Nature), 1932.

|

|

Task 1
Create a research page on your next slide about Karl Blossfeldt.
•Write a paragraph about the artist, to analyse his work. Include pictures of his work.
To analyse a photographer's work, you need to talk about what is in the picture, how they have taken the photograph, camera or editing techniques they have used, how they have used the formal elements (colour, composition, lighting, viewpoint etc), what you like about the work, and how their work could inspire your own photographs. Try to use key words.
If you need help getting started, use these sentence starters but write as a paragraph...
Artist's Name takes photographs of...
He/she takes his/her photos by...
This photographer considers formal elements in their work by...
Something I like about Artist's Name's photography style is...
I could take inspiration from this photographer in my own work by...
Task three: Karl Blossfeldt photoshoot plan

Why is planning important before doing a photoshoot? Why might drawing be useful rather than just notes? |

|

Task 1
Look at the objects you will be photographing next lesson. Choose ONE object. Consider the sections that might be interesting to look up close at, by drawing boxes onto found images of these objects like the example below. You can do this on powerpoint using the shape tool.

Task 2
For a different object, show a different planning method, and draw two different compositions that you could photograph. Include a photo of the whole object.
You could do this by hand on paper OR on the computer. Ensure that your presentation is neat.
You could do this by hand on paper OR on the computer. Ensure that your presentation is neat.


Task Four: Karl Blossfeldt photoshoot

Photoshoot lesson in the art classroom taking photos of natural objects. Click image below for supporting worksheet:


Homework: Take another 10 photos of close up nature using a macro setting where possible.
Add them to your powerpoint.
Task Five: Karl Blossfeldt editing and presenting best photos

Your task: Edit 3 photos in the style of Blossfeldt and annotate to explain how you edited.
How to edit your photos to enhance them in the style of Blossfeldt
•Open your favourite photo from last lesson that links most to Blossfeldt in photoshop.
Start by making your picture black and white (go to image, adjustments, desaturate), then change the brightness and contrast (go to image, adjustments, brightness and contrast) of your picture so it is similar to the style of Blossfeldt.
Next, crop your picture if you need to so there isn't too much negative space around your object (crop tool is in the tool bar).
Finally, you might need to clean up your white background there are two ways that you could do this:
1. use the clone tool (on the tool bar) to copy sections from a clear area of background to replace areas of shadow/marks etc. (press alt on the good area then let go, then right click and colour in the area you want to replace. You will need to do this a few times).
2. use the dodge tool to lighten areas of the background (this is on the tool bar- but you might need to right click on the burn/sponge tool if you cant see it) draw over the areas that need lightening.

To complete this section, identify your best Blossfeldt photo and put it full size on the next slide to show it off.
Complete a self assessment in your feedback book to review your progress.
Complete a self assessment in your feedback book to review your progress.
Task Six: Pyanek

Describe the style of Pyanek's work from these images below:


Pyanek
An anonymous artist and photographer has captured mundane objects in an entirely new way – making them very difficult to distinguish.
Using a reverse lens macro technique, Pyanek has collated his extreme close-up shots in a series he calls ‘Amazing Worlds Within Our World’.
Featuring an array of household items, foods and objects we use on an everyday basis, the images are striking.
Using a reverse lens macro technique, Pyanek has collated his extreme close-up shots in a series he calls ‘Amazing Worlds Within Our World’.
Featuring an array of household items, foods and objects we use on an everyday basis, the images are striking.


Quick quiz: Can you guess what the objects are on this webpage?? Click below... Answers are at the bottom of the page.
https://www.dailymail.co.uk/news/article-3000420/Anonymous-photographer-uses-reverse-lens-macro-technique-capture-everyday-objects-unrecognisable-way.html
https://www.dailymail.co.uk/news/article-3000420/Anonymous-photographer-uses-reverse-lens-macro-technique-capture-everyday-objects-unrecognisable-way.html

Task 1
Create a research page on your next slide about Pyanek.
•Write a paragraph about the artist, to analyse his work. Include pictures of his work.
To analyse a photographer's work, you need to talk about what is in the picture, how they have taken the photograph, camera or editing techniques they have used, how they have used the formal elements (colour, composition, lighting, viewpoint etc), what you like about the work, and how their work could inspire your own photographs. Try to use key words.
If you need help getting started, use these sentence starters but write as a paragraph...
Artist's Name takes photographs of...
He/she takes his/her photos by...
This photographer considers formal elements in their work by...
Something I like about Artist's Name's photography style is...
I could take inspiration from this photographer in my own work by...

Task seven: Pyanek style Photoshoot.

Write a list of objects that you could photograph in the style of Pyanek.

Task 1: Photoshoot
Take photos of 20-30 different objects close up.
For each object, try to take at least 3 different angles.
For each object, try to take at least 3 different angles.
Task 2: Contact sheet
A contact sheet is an overview of your images, where you can see a snapshot of all of the photos you took in a photoshoot. Photographers draw on or make notes on these to identify the weakest and best photos to help them choose which ones to edit, like the examples below.

|

|
Take a screen shot of all of your photos. Identify which are your best photos by adding a green tick, and your weakest with a red cross.
For the higher marks, also add notes to identify why some photos are better than others. You might comment on things like lighting, colour, contrast, composition, focus, etc.
For the higher marks, also add notes to identify why some photos are better than others. You might comment on things like lighting, colour, contrast, composition, focus, etc.
Homework: Take another 10 photos of close up objects inspired by Pyanek .
Add them to your powerpoint.
Task Eight: Pyanek editing and outcomes

For Pyanek, you will be asked to edit in two ways.
1. Enhance colour
2. Show alternative compositions by cropping.

Task 1: Enhance colour
How to edit your photos to enhance the colour
Open your photo then make changes within any of these settings to enhance them:
- Image, adjustments, Brightness/contrast
- image, adjustments, hue and saturation
- image, adjustments, curves (drag the line around in different places)
- Image, adjustments, Brightness/contrast
- image, adjustments, hue and saturation
- image, adjustments, curves (drag the line around in different places)
How to present your photos
For this task, I'd like you to show the before and after edited photo, so that you can see clearly what changes have been made. Do this by presenting them side by side, with the titles Before and After.
Explain how you have edited, using key words from photoshop/photopea to describe what you did.
Explain how you have edited, using key words from photoshop/photopea to describe what you did.
Task 2: crop your image to change composition
How to edit your photos to enhance the colour
Open your EDITED photo full page then use SHIFT+WINDOWS+S to snip different sections and paste them onto a new slide.
Do this 3 times for each photograph.
Do this 3 times for each photograph.
How to present your photos
For this task, I'd like you to include the original photo and clearly label it as the original (top right of the page).
Then paste your cropped images to fill the rest of the page.
Explain why you chose these sections to crop in a sentence or two. What makes them interesting? How do they change/ improve the image?
Then paste your cropped images to fill the rest of the page.
Explain why you chose these sections to crop in a sentence or two. What makes them interesting? How do they change/ improve the image?

To complete this section, identify your best Blossfeldt photo and put it full size on the next slide to show it off.
Complete a self assessment in your feedback book to review your progress.
Complete a self assessment in your feedback book to review your progress.
Task Four: Cropping rule of thirds


|
Log into teams to read your feedback on the leading lines task. |

Composition: Rule of Thirds
The rule of thirds is a compositional guideline that breaks an image down into thirds (both horizontally and vertically) so you have nine pieces and four gridlines.
To use it effectively, the photographer should place the main subject matter on one of the areas where the guidelines cross.
To use it effectively, the photographer should place the main subject matter on one of the areas where the guidelines cross.
Which photo uses rule of thirds below?


photoshoot task. take 10+ photos in school that demonstrate Rule of thirds then identify the technique by using red lines like the image below


Editing task 2: Cropping
Crop your edited photograph 3 or more times, each time pasting it onto the same slide of a powerpoint to show different compositions like the example below. At least one of these must be Rule of Thirds.

Complete these sentences to review the task, on a new slide:
Rule of thirds is...
I have edited my photo by...
I have used the crop tool to...
Key words to use:
COMPOSITION... ALTERNATIVE... RULE OF THIRDS... NEGATIVE SPACE... FOCAL POINT... SUBJECT MATTER
Rule of thirds is...
I have edited my photo by...
I have used the crop tool to...
Key words to use:
COMPOSITION... ALTERNATIVE... RULE OF THIRDS... NEGATIVE SPACE... FOCAL POINT... SUBJECT MATTER
Task Four: Cropping rule of thirds

Log into teams to read your feedback on the leading lines task.

Composition: symmetry
In photography symmetry appears when parts of your composition mirror other parts.
It is created when two halves of your scene look the same and balance each other out. Symmetry defines something being clean, proportional and balanced and will make pictures appear neat, tidy and clinical.
It is created when two halves of your scene look the same and balance each other out. Symmetry defines something being clean, proportional and balanced and will make pictures appear neat, tidy and clinical.
find a selection of interesting examples of symmetrical photography. add these to your powerpoint.


photoshoot task. take 10+ photos in school that are symmetrical, within the following categories:
the human figure
architecture
nature
objects
upload your photos to your powerpoint.

Homework
take 20 more photos that demonstrate symmetry, including some within the categories above, but they can be of anything you wish. it would be great to see some reflections in mirrors or water!
upload them to your powerpoint.
take 20 more photos that demonstrate symmetry, including some within the categories above, but they can be of anything you wish. it would be great to see some reflections in mirrors or water!
upload them to your powerpoint.
Assessment: What have you learnt about composition?
write 200-300 words about what you have learnt through these tasks (on the last slide of your powerpoint).
Demonstrate your understanding with clear examples. you may refer back to any of your work to help you with this.
Ensure that SPAG is correct.
Demonstrate your understanding with clear examples. you may refer back to any of your work to help you with this.
Ensure that SPAG is correct.
